Adsense works great on content receiving good traffic from search engines, because it is a targeted keyword based PPC ad network. but if you receive good traffic from search engines and still don't make considerable income with it then you might be doing some mistakes somewhere in implementation, and ads placements is included in this. So make sure your ads are on the right placements where visitors pay attention at first. We can implement Google ads on any platform or manually created websites, we can insert the ads wherever we want into our pages. But the problem is with blogger blogs, when you use blogger.com for your blog then you are limited to add third party widgets only by using HTML/JavaScript widget in the Layout area. You don't have direct access to the blog post body or Single post in WordPress. Therefore, it becomes headache when you want to insert Adsense ads inside your blog posts, and this is very necessary because the best positions for Google ads are; the header, the post body, below the posts and the sidebar. You can use the header in some templates and sidebar in every template, but the main placement is below the post titles in blogger.
But as you might know that blogger.com is built within XML which doesn't allow some characters inside scripts such as >, +, <, && and so on. Therefore, we'll need to alter the ad codes to make it possible.
So this post is all about inserting Google ads below post titles in Blogger for increasing your CTR (Click rate on ads), and the revenue. obviously, when CTR get boosted, the revenue get increased.
I won't take your much time, and I've simplified the tutorial, you just need to follow the tips and easily insert Google Ads below post titles in blogger. And you'll see a dramatic change in your earning and CTR. Let's start how to do this.
Login into your Adsense account: Adsense Home Page.
Go to my Ads at top left side and click My Ads >> Create a new Ad unit
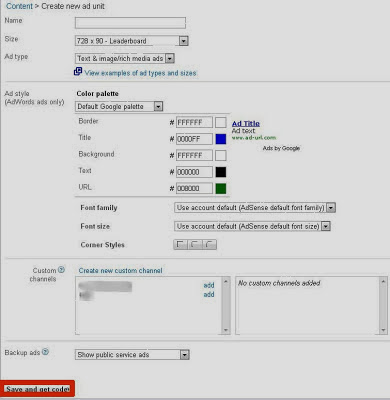
Now make the settings for new ad unit as per your choices (See Below picture for example)

4. Select an ad unit of 300*250 which is best for inserting after the post titles in blogger and click the Save and Get code button which is highlighted in the screen shot.
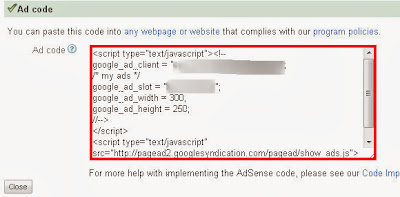
5. You'll get a pop up in which the generated code for the ad unit will be looking like this image:

6. Just copy all the code and paste into this tool Adsense Code Converter.
The above tool actually converts the characters to be accepted by blogger core, because blogger in fact doesn't allow illegal characters like <,>,+,&& and so on, so therefore, you need to convert the code by using above tool, so it will convert all the illegal characters to the accepted ones.
Now your converted code should be looking like this:
<script type="text/javascript"><!--
google_ad_client = "ca-pub-XXXXXXXXXXXXXX";
/* XXXXXXX */
google_ad_slot = "XXXXXX";
google_ad_width = 300;
google_ad_height = 250;
//-->
</script>
<script type="text/javascript"
src="http://pagead2.googlesyndication.com/pagead/show_ads.js">
</script>
All the illegal characters are now removed by that tool and this code is now acceptable for blogger. Now for adding the code to blogger follow these steps (In Blogger New Edit HTML):
Blogger >> Template >> Edit HTML >> Jump to Widget >> Blog1 >> Find var='post'
When you found var='post' just click the arrow at the left side for expanding that widget
Now when the widget is expanded, search for this code: <data:post.body>
Just before <data:post.body> paste the converted code
Now your code should be looking like this:
This is for displaying the ads below the post title, if you want to insert the ads below the post then simply paste the converted code below <data:post.body> tag. So the ads will be showing up below the post.
<script type="text/javascript"><!--
google_ad_client = "ca-pub-XXXXXXXXXXXXXX";
/* XXXXXXX */
google_ad_slot = "XXXXXX";
google_ad_width = 300;
google_ad_height = 250;
//-->
</script>
<script type="text/javascript"
src="http://pagead2.googlesyndication.com/pagead/show_ads.js">
</script>
<data:post.body/>
This is for displaying the ads below the post title, if you want to insert the ads below the post then simply paste the converted code below <data:post.body> tag. So the ads will be showing up below the post.
But in above code there is a problem, the ads will be appearing on the home page as well as on single posts, and we don't want that because we need this unit to be displayed only on single posts, not on home page. So we'll need to add an if statement which is a XML tag in blogger, so now you should be inserting the ads along with these two conditional tags like this:
Now by inserting the <b:if></b:if> tags we are actually making the codes to appear only on post pages, but not on home page.
<b:if cond='data:blog.pageType == "item"'>
<script type="text/javascript"><!--
google_ad_client = "ca-pub-XXXXXXXXXXXXXX";
/* XXXXXXX */
google_ad_slot = "XXXXXX";
google_ad_width = 300;
google_ad_height = 250;
//-->
</script>
<script type="text/javascript"
src="http://pagead2.googlesyndication.com/pagead/show_ads.js">
</script>
</b:if>
Now by inserting the <b:if></b:if> tags we are actually making the codes to appear only on post pages, but not on home page.
You can also use the <center></center> tags if you want the ads to be centered align. Just add the <center> tag before the ad code and </center> at the end of the ad code, so the ads will be centered align.
Conclusion
By doing this, you are not gonna violating any program policy of Google Adsense, because this is necessary for inserting the ads inside blog posts, and also you are just converting the characters to alternative characters. This doesn't mean you are changing or altering the entire ad code. So don't worry and take it easy.
I hope you'll insert Google ads easily by following all the steps mentioned in this tutorial. However, if you faced any difficulty then I'm always here to help you out, just leave your comment. Take Care!


0 comments:
Post a Comment